
Record a short rehearsal with your microphone, game, alerts and scene changes, then listen to the saved file. Sort out missing or doubled sound before reaching for filters.
A recording with one clear voice, the game and alerts you want, and no surprises when you switch scenes.
In this guide
Before you start
- OBS Studio open, with your usual microphone and headphones connected.
- A game or other sound ready to record alongside your voice.
- A recording folder with enough free space.
- MicrophoneCable & connection
- Operating systemInput & permission
- OBS mixerSource, meter & mute
- RecordingTrack & playback
Listen to what you actually recorded
Make a local recording with the microphone, game, alerts and scene changes you plan to use live. Then stop recording and play the file through headphones. That last part matters: a bouncing meter tells you OBS receives a signal, but it doesn’t tell you whether your words made it onto the track you’re listening to.
Start with the basics. Can you hear your voice once? Can you understand it while the game and alerts play? Does the microphone stay with you when you switch scenes? Leave filters alone until those answers are yes. This checks the mix on your computer; a private platform rehearsal comes afterward.
Get your usual setup ready
Connect the devices you normally stream with and put on your headphones. Open a short stretch of gameplay, or another sound you’re allowed to record. Close private conversations and pause notifications so your sound check doesn’t end up with something you never meant to share.
Look at Settings → Output and confirm where OBS saves recordings. Check that the drive has room. You can do the whole rehearsal with Start Recording, without starting a broadcast. If a control has a different name in your installed OBS release, use the linked guide to find its equivalent.
- List what the recording should contain: your voice, gameplay, guests and alerts.
- Name each audio source so you can recognise it later. Include any virtual mixer in your notes.
- Save or note your current settings before changing a route. You’ll want a way back if an experiment makes things worse.
If the meters move but the file is silent, check the recording tracks before changing the mic. OBS Recording Has No Audio? Check the Tracks ↗
1. Give each sound one way into OBS
Open Settings → Audio and check which microphone is selected. While troubleshooting, choose the named device rather than “Default”. Now look at the sources in your active scene. A device can be captured globally or through a source in that scene. Selecting the same microphone in both places can give you two copies of your voice.
Pause the game and speak. Watch which meters move. Then stop speaking and play some game audio. If your voice lights up two meters, find out why before disabling either one. It could be duplicate capture, or the microphone could be hearing your speakers. Keep the route you meant to use and test the change.
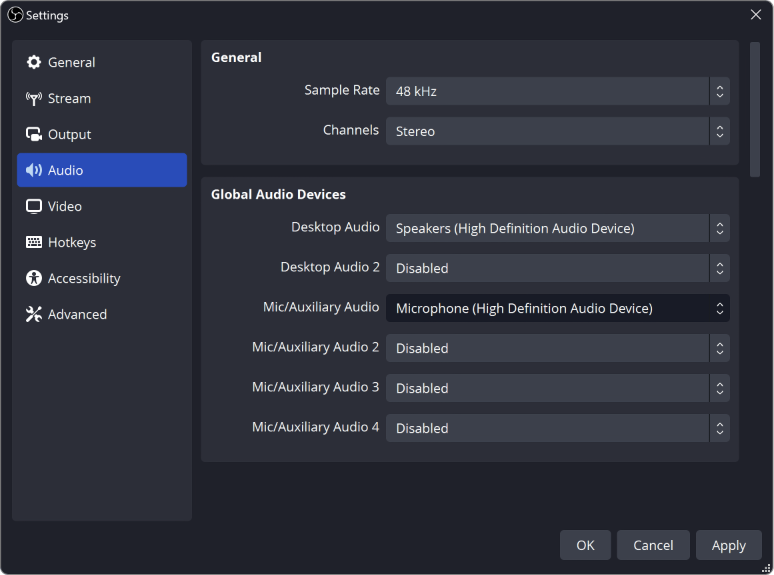
Settings → Audio contains the global capture devices. Choose the microphone deliberately; an enabled device here can overlap a scene-specific Audio Input Capture.
If the recording is right but your headphones sound wrong, follow the monitoring paths. Direct Monitoring vs OBS Monitoring: Know What You Are Hearing ↗
2. Check what you hear and what gets recorded
Check the microphone’s output mute and fader. The OBS mixer treats output and monitoring separately: output is what leaves that source for the mix; monitoring sends it to your listening device. Older OBS layouts may group these choices differently, so read the labels rather than copying a screenshot from another version.
If you enable monitoring, keep your headphone level comfortable and check which device receives it. Is OBS also capturing that device as desktop audio? If so, your monitored voice may have found a second way into the mix. Hearing yourself in headphones is only part of the picture. Keep going and listen to the recording.
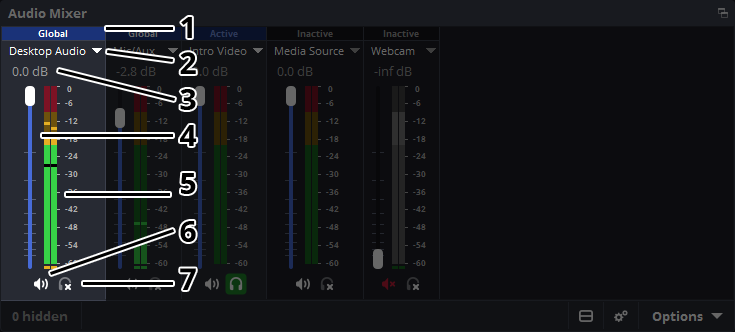
Use the meter to confirm activity, then check the separate level and mute/monitor controls. These numbered callouts belong to the official OBS guide.
3. Record the things you do on stream
Choose Start Recording for this rehearsal. OBS recommends MKV because it’s more resilient if recording stops unexpectedly; make sure your playback workflow supports the format you use. If your current output settings already work, leave them in place while checking audio routes. You don’t need to copy someone else’s entire preset.
Run through the short sequence below. Stay in your normal chair position and make the excited line sound like something you’d actually say. There’s no need to shout into the mic. Stop the recording before opening the file, then listen from beginning to end.
- Say a normal sentence at your usual speaking distance.
- Say a more excited line while staying near the microphone.
- Talk over gameplay and an alert you would normally use.
- Pause for a moment and listen for the room, keyboard and equipment.
- Switch through your live scenes and check that each one includes the sounds it should.
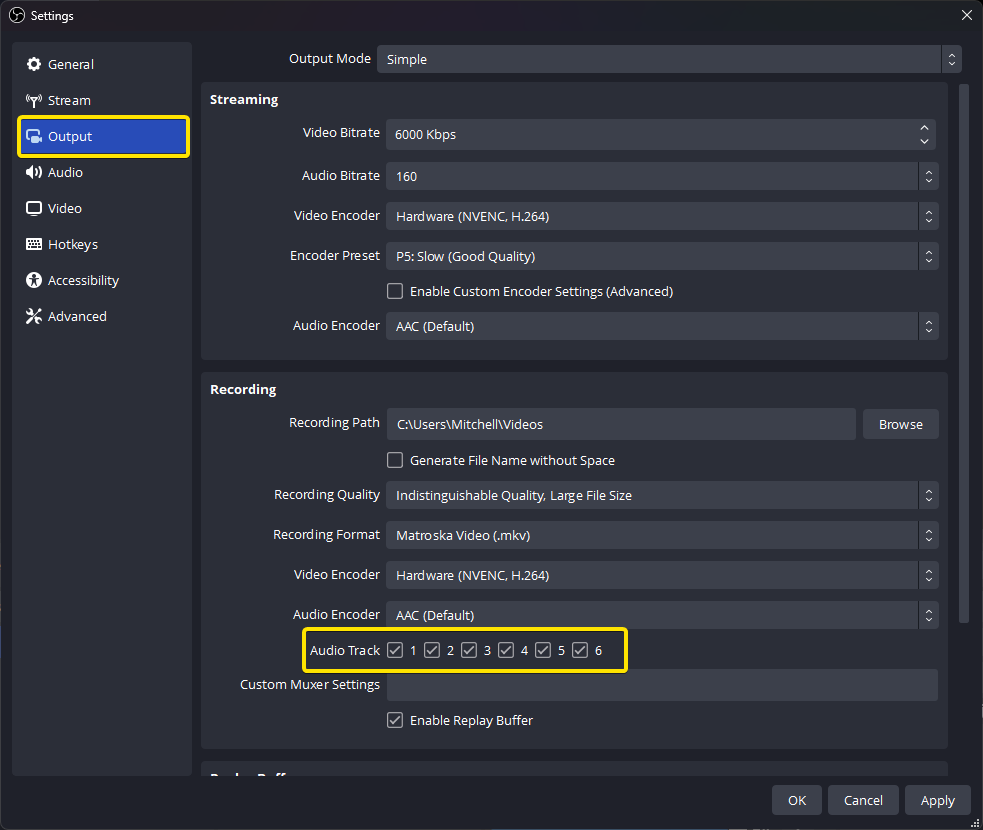
Settings → Output → Recording selects the tracks written into the file. Source assignments and enabled output tracks are separate checks.
4. Match what you hear to the right fix
Open the saved file. If you record multiple audio tracks, remember that a normal video player usually plays one at a time. Speech might be on another track. Compare the source assignments in Advanced Audio Properties with the tracks enabled under Output, then select the track you want to hear. Keeping one complete mix makes quick playback much easier.
Make one change and record the same passage again. The same words over the same game sound are easier to compare than two completely different takes. Aim for speech you can follow comfortably. A particular fader position or filter preset can’t tell you that on its own.
| What you hear | Check this first | What you want next |
|---|---|---|
| No voice and no microphone meter | Device, permission and capture route in the microphone guide | The right mic responds before you adjust its sound |
| Meter moves, but the file has no voice | Output mute, source-to-track assignment and the playback track | Your voice is on the track you play |
| Doubled or delayed voice | Duplicate capture and monitored audio captured again | One voice in the saved mix |
| The game buries your words | Turn down the game or alerts, then repeat the sentence | Speech stays understandable during gameplay |
| The mic disappears in one scene | A scene-specific source versus your global microphone | Each scene contains the sounds you planned |
Keep the sound check short enough to repeat
When the saved mix has the right sounds, your speech stays clear over the game, and scene changes don’t lose or double your microphone, save that setup. You’re ready to check it in a private platform rehearsal, where you can also look at delivery beyond your computer.
You don’t have to repeat every setting check before every stream. After changing a USB port, headset, scene or routing app, replay the part that change could affect. If the microphone fails outside OBS too, go back to the device and system checks. A silent input usually needs investigation before it needs a shopping trip.
Add an overlap check to the preflight
After checking each sound alone, record the moment when several arrive together: commentary over the game, an alert during speech and a scene change while the game continues. Keep a short, repeatable sequence so that a future change has something concrete to compare against.
A healthy-looking microphone meter does not tell you whether an alert masks a quiet sentence. Judge the saved file at a normal listening level and write one decision for each overlap. Do not increase every source until each sounds impressive alone; the audience hears their combination.
| Observation | Next change | Expected result |
|---|---|---|
| Alert hides a spoken word | Reduce or redesign that alert’s contribution | The full sentence remains understandable |
| Game is clear alone but speech is difficult during action | Adjust their relative levels in that passage | Important game cues and commentary remain useful |
| Sound changes at a scene transition | Inspect the sources shared by those scenes | The intended mix continues once through the transition |
Use dynamics processing only after the source balance is clear. OBS Compressor and Limiter: Keep Loud Reactions Under Control ↗
Still stuck?
The microphone meter stays still.
Check whether the computer can hear the mic, then follow its input into OBS. Continue with this guide ↗
The meter moves, but the recording is silent.
Check output mute, the tracks OBS records and the track your player is playing.
Sources & references
The OBS controls in this walkthrough follow the official guides linked below. November 2026 addition: documentation-based diagnostic examples; no new hands-on hardware result or platform upload test is claimed.
- OBS — Audio Sources ↗Checked 2026-10-18
- OBS — Audio Mixer Guide ↗Checked 2026-11-04
- OBS — Multiple Audio Track Recording Guide ↗Checked 2026-10-18
- OBS — Standard Recording Output Guide ↗Checked 2026-10-18
- OBS — Quick Start Guide ↗Checked 2026-10-18
Spotted something out of date? Let Alex know.
How we put our guides together ↗