
When OBS can't hear your mic, the sound is getting stuck somewhere between your mic and your recording. Start with your computer, then move into OBS. Most of the time it's one of the first three steps.
- Check that your computer hears the mic. On Windows, go to Sound settings. On a Mac, go to Sound > Input. Talk and watch the level move.
- Give OBS permission to use the mic. Windows: Privacy & security > Microphone. Mac: Privacy & Security > Microphone, then turn on OBS.
- In OBS, go to Settings > Audio and choose your mic by its name instead of "Default".
- Look at the Audio Mixer at the bottom of OBS while you talk. If the bar doesn't move, make sure the mic isn't muted and the volume isn't all the way down.
- The bar moves but your recording is silent? Open Advanced Audio Properties and make sure your mic is on the right track.
- Close other apps that might be using the mic, like Discord or a voice changer, then restart OBS.
Your microphone reaches OBS and appears once in the recording, or you know exactly which check it fails.
In this guide
Before you start
- Your microphone connected as usual and OBS Studio open.
- Access to the sound and privacy settings on Windows 11 or macOS.
- A test scene and a note of your current audio settings.
- MicrophoneCable & connection
- Operating systemInput & permission
- OBS mixerSource, meter & mute
- RecordingTrack & playback
First, does your computer hear you?
Start in your computer’s sound settings, not by rebuilding your scene. If the system can’t hear the microphone, check the connection, mute control and device setup. If it hears you but OBS doesn’t, look at OBS permissions and the selected input. If OBS’s meter moves but the recording has no voice, the input may already be working: check output and tracks.
That split saves a lot of random clicking. A still meter doesn’t automatically mean you need a new microphone, and a moving one doesn’t tell you what the saved file contains. Use the table to pick your starting point, then follow the sound until it stops.
| What you notice | Where to start |
|---|---|
| The input is missing or silent in system settings | Step 1: connection and system input test |
| The system hears you, but OBS doesn’t | Steps 2–3: permission and the selected OBS device |
| The OBS meter moves, but the recording is silent | Step 4: output and recording tracks |
| You hear two copies of your voice | Step 5: find the duplicate route |
Use the Windows test result to choose the next branch
On Windows 11, the microphone device page under Settings → System → Sound can record a test sample and play it back. Use the same named microphone you intend to capture in OBS. A moving indicator alone is weaker evidence than hearing the sentence you just recorded.
If that sample is clear, keep the device and cable unchanged while checking OBS. For desktop-app access, Microsoft documents a separate permission switch; OBS need not appear as an individual app in the store-app list. Change only the failing checkpoint so a restored voice has an explainable cause.
| Observation | Next change | Expected result |
|---|---|---|
| Windows cannot play back your test phrase | Check the selected input, hardware mute and connection | Establish voice outside OBS first |
| Windows sample works but the OBS meter stays still | Check desktop-app permission and the named source device | The same microphone reaches OBS |
| OBS meter moves but the saved file is silent | Inspect recording track assignment and playback track | Follow the file route instead of replacing the microphone |
Continue here only after the OBS meter receives the intended voice. OBS Recording Has No Audio? Check the Tracks ↗
Note what’s plugged in before changing it
Stop your stream and write down the microphone model, connection and input name shown by your computer. For an XLR microphone, that name may be the audio interface rather than the microphone itself. For a USB mic, check its physical mute control. Follow the manufacturer’s setup instructions for any power or driver requirements.
Take a screenshot or make a note of audio settings you might change. A separate test scene gives you room to experiment without dismantling the live layout. Change one thing at a time, then try the microphone again. If the result gets worse, put that setting back before moving on; otherwise you can end up troubleshooting your last three experiments as well as the original fault.
Got the mic working, but now hear it twice? Find the second capture before adding filters. OBS Microphone Sounds Doubled? Find the Second Copy ↗
1. Listen to the mic outside OBS
On Windows 11, open Settings → System → Sound. Under Input, choose your microphone and open its properties. Run the microphone test, speak a normal sentence, stop the test and play it back. Check that the input reacting to your voice is the one you actually want, rather than a webcam or headset mic nearby.
On a Mac, choose the microphone in System Settings → Sound → Input, then try recording with an app you already use and trust. If it’s silent there too, check the connector, physical mute and manufacturer’s setup guidance. Try a known-correct cable or computer port before making changes inside OBS.
- You want to hear your voice from the intended microphone in the system test or another trusted recording app.
- If the device is still missing, check its compatibility and manufacturer support. OBS can’t capture an input the computer can’t use.
- If the mic works outside OBS, leave that connection alone and check permissions next.
If the OBS meter already moves, jump to the recording-track checks. OBS Recording Has No Audio? Check the Tracks ↗
2. Let OBS use the microphone
On Windows 11, open Settings → Privacy & security → Microphone. Check microphone access and the separate desktop-app access setting. Can't find OBS in the individual app list? OBS is a desktop app, so looking only through Microsoft Store apps won't settle its permission. Match the labels to your Windows version.
On macOS Ventura or later, quit OBS, open System Settings → Privacy & Security → Microphone and allow OBS. Reopen it afterward. You can also use OBS Studio → Review App Permissions. Microphone and screen-recording access are separate: letting OBS capture your desktop won’t give it microphone access.
- OBS should now have permission to use the input. Reopen it if your system asks you to.
- On older macOS releases, look under System Preferences → Security & Privacy and follow Apple’s instructions for that version.
- If a work or school administrator controls the setting, ask them to enable the access you need rather than trying to remove the restriction.
3. Pick the microphone by name in OBS
Decide how you want to capture this mic. For a microphone used across scenes, select the named device under Settings → Audio. For a mic that belongs only in particular scenes on Windows or macOS, add an Audio Input Capture source to the test scene and select the device in its properties. Avoid capturing the same mic both ways.
While diagnosing, choose the actual input name instead of “Default”. Open the scene containing that source and speak. On Linux, OBS uses ALSA or PulseAudio capture source names; the device and permission repair steps in this guide are for Windows and macOS.
- Watch for the intended microphone’s meter to respond when you speak.
- If you reconnected a USB device, reopen the source properties and check that OBS still has the right device selected.
- Give the source a recognisable name. A webcam mic, headset mic and separate USB mic are three different inputs, even when they’re on the same desk.
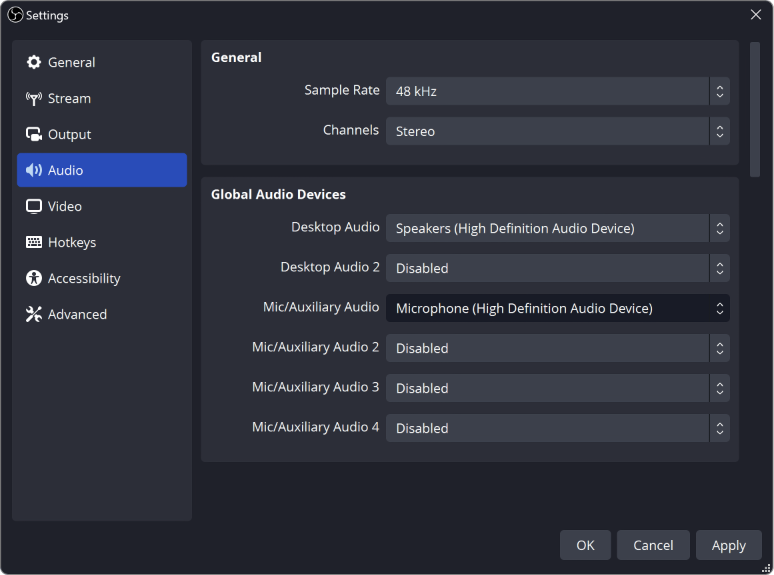
Settings → Audio contains the global capture devices. Choose the microphone deliberately; an enabled device here can overlap a scene-specific Audio Input Capture.
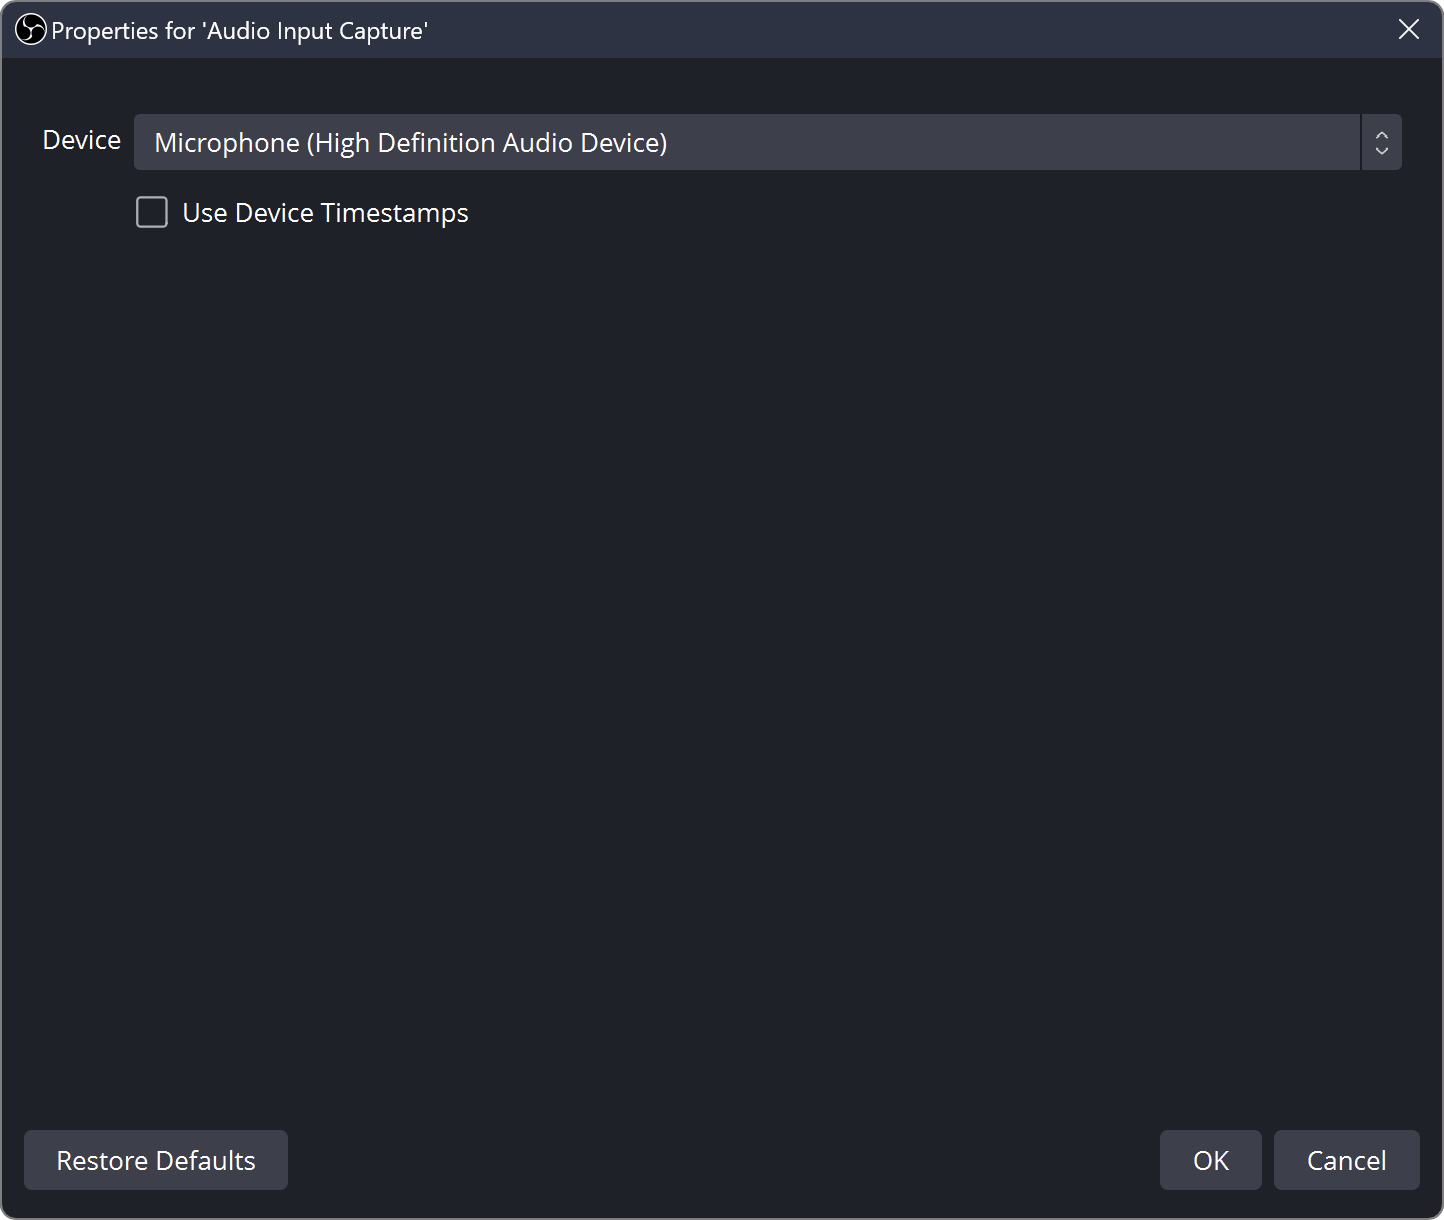
A scene-specific Audio Input Capture has its own Device selector. The microphone shown is the documentation example, not a device detected on your computer.
4. If the meter moves, check the recording
Check that the source isn’t muted to output and its fader isn’t all the way down. Then make a short local recording and listen to it. You can hear a monitored microphone in your headphones while leaving it out of the recorded output, so monitoring alone won’t settle this.
For a multiple-track recording, compare two separate places below. Then choose the track containing your voice in the player: most normal video players play one audio track at a time. If a filter could be silencing the mic, save its settings and bypass that filter in the test scene before repeating the same sentence.
Assign the source to a track
Open Advanced Audio Properties and note which recording track is checked for this microphone. Keep the source's output mute off for the test.
Look for: You have identified the track meant to contain the microphone.
Enable that track in the recording output
Under Settings → Output, compare the recording tracks enabled in your output mode with the source assignment. Make a fresh recording after correcting a mismatch.
Look for: The saved recording includes the assigned track; select that track during playback.
If the track exists but is silent, return to the source mute, level and filters.
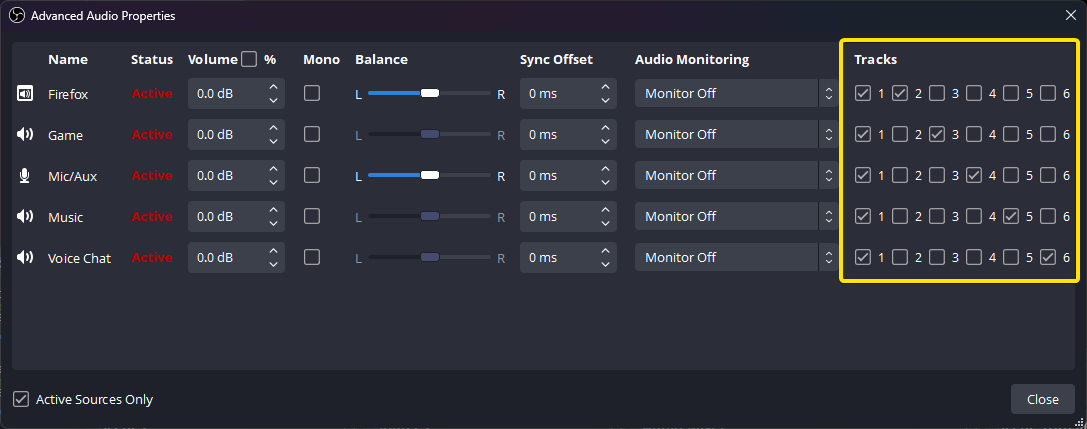
Advanced Audio Properties assigns each source to recording tracks. The highlighted example sends sources to track 1 as well as separate tracks.
5. If you hear yourself twice, find the second copy
Look for a microphone selected globally and added again in the active scene. Keep the capture you intended and disable its duplicate. Next, check whether monitored audio comes back through another captured device. Also compare headphones with room speakers: sound reaching the microphone through the room needs a different fix from two software captures.
If it’s still failing, you now have something useful to take to support. Note your operating system, OBS version, device, connection and the first check above that fails. Leave out stream keys, account credentials and private audio. “The mic works in the system test but not this OBS source” gives someone much more to work with than “I tried lots of filters”.
Check one recording before going live
Finish with a recording that includes speech and the scene changes you normally use. The right meter should respond, your voice should appear once on the track you play, and changing scenes shouldn’t unexpectedly lose it. Then use the full audio check to bring in gameplay and alerts and set their balance.
If the mic still fails the system input test, return to the device-specific setup instead. If it works but sits too far away to use comfortably, that’s a placement problem rather than a missing-input problem. The small-desk microphone guide can help you think through the space once you know what needs to change.
Still stuck?
The mic fails the system’s input test.
Check its cable, mute control and device setup before changing anything in OBS.
The mic works in other apps, but not OBS.
Check OBS’s microphone permission and select the device by name.
Your voice appears twice.
Look for a duplicate microphone capture or monitored audio returning to the mix.
Sources & references
These steps follow the OBS, Microsoft and Apple guides linked below. November 2026 addition: documentation-based diagnostic examples; no new hands-on hardware result or platform upload test is claimed.
- Microsoft — Set up and test microphones in Windows ↗Checked 2026-10-18
- Microsoft — Turn on app permissions for your microphone ↗Checked 2026-10-18
- Apple — If you can’t record audio from an external source on Mac ↗Checked 2026-10-18
- OBS — macOS Permissions Guide ↗Checked 2026-10-29
- OBS — Audio Sources ↗Checked 2026-10-18
- OBS — Audio Mixer Guide ↗Checked 2026-10-18
- OBS — Multiple Audio Track Recording Guide ↗Checked 2026-10-29
- OBS — Quick Start Guide ↗Checked 2026-10-18
- Apple — Change the sound input settings on Mac ↗Checked 2026-10-18
- Windows Mic — official documentation ↗Checked 2026-11-04
Spotted something out of date? Let Alex know.
How we put our guides together ↗