
Use an Image source for a still graphic and a local media source for a supplied video. Import Overlay File is for a genuine .overlay scene collection, which a ZIP of images may not include.
Your graphic appears in a named scene, sits in the right layer and plays as expected in a saved recording.
In this guide
Before you start
- Streamlabs Desktop on a supported Windows or macOS system.
- Extracted graphics in a folder you plan to keep.
- The pack’s file list and instructions.
Find out what the download contains
Extract the ZIP and look at the file list. A PNG might be a full background or a frame with a transparent opening. A video might be the moving scene itself. A .overlay file is a scene collection that uses a separate import command. Changing an image or ZIP extension to .overlay will not turn it into that collection.
Put the extracted files somewhere you can keep them, with folders named for the pack and scene. Choose one graphic to add first. If it does not appear, you then have one source and one file to investigate. That is much easier than rebuilding the entire live layout while you are still working out which export you need.
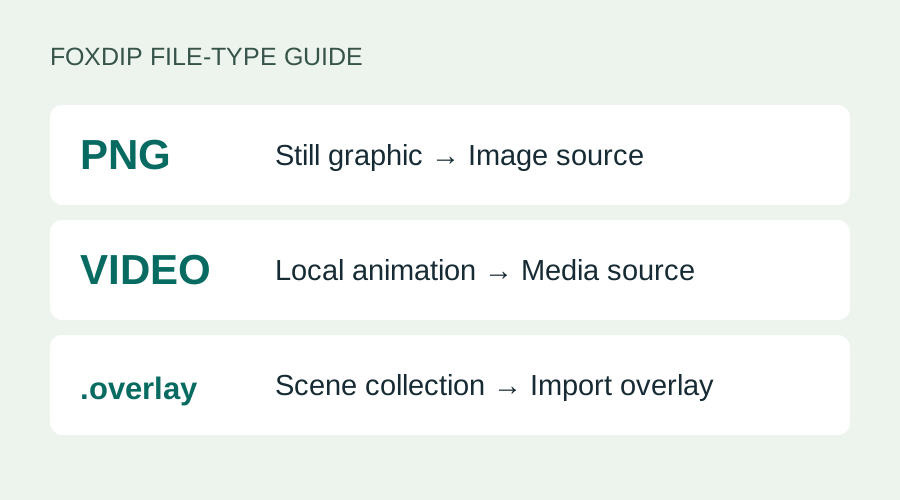
A file-type decision guide, not a Streamlabs screenshot. Check your actual download before choosing a source or importing a collection.
Give the first graphic its own scene
Use the plus control in Scenes to create a separate scene and name it something obvious, such as Overlay check. Select that scene before adding a source. These steps are for Streamlabs Desktop on Windows or macOS; if you are using the mobile app, start with its own setup instructions.
Name the source after its job and file, for example Frame — local PNG. Several sources all called Image are easy to confuse later. Add only the camera or capture you need to judge the artwork around it. Keeping this separate lets you return to your normal scene while you sort out a file or placement problem.
Use two backgrounds to see whether the file or the source needs attention. Fix a solid overlay background ↗
For a still graphic, choose Image
In Sources, press the plus control, choose Image and add the source. Browse to the extracted image in its properties and finish adding it. If a PNG is missing from the Import Overlay dialog, you are in the wrong tool for that file. Return to Sources and use Image rather than renaming the download.
Position the artwork in the preview without stretching its shape. A full background belongs behind the content it should leave visible. A webcam frame belongs above the camera it surrounds. Sources near the top of the list appear in front, so check the order before assuming a disappeared camera or frame has failed to load.
Carry the same look into your About section, with words and links that visitors can use. Set up your Twitch panels ↗
For moving media, select the local file
Add a media source for a supplied animated video. Use its local-file option and browse to the extracted clip. A network Input URL is a different mode, and Media Share is a different feature again. For a downloaded scene file on your computer, you want the local media controls.
If the scene is meant to repeat, enable Loop and watch a complete cycle. Switch to another scene and back to see how the clip restarts. Use the pack’s instructions and the controls available in your installed build to adjust that behaviour. Listen too: if the clip contains sound, decide whether it belongs in the live mix before using the scene.
Use Import Overlay when the pack includes .overlay
For a genuine .overlay file, follow Settings → Scene Collections → Import Overlay File, then select it and review the imported scenes. A pack of individual PNGs or videos can still build a complete look; you will add those files as sources instead of importing a scene collection.
After an import, go through the camera, audio, labels and file locations. The demonstration scene cannot know which devices or words you want to use. Remove optional pieces you do not need, reconnect anything pointing at the wrong place, and make sure the imported layout fits your own stream before you rely on it.
Make a short recording before you go live
In Settings → Output, choose where recordings should be saved. Press Record to make a local clip, then press it again to stop. Open the saved file and look at the source order, cropping and full animation loop. Listen to the audio as well. This lets you judge the scene people will see, beyond the source-properties window.
If a graphic goes missing after you tidy its folder, reopen the source properties and locate the file again. Keeping the original folder in place avoids that extra repair. Once the scene looks right, note which source uses which file, keep the originals and make later changes one source at a time.
Separate a picture file from an installed scene collection
A PNG is an image element; a theme or exported scene collection can contain a much larger arrangement. Before importing, write which result you need: one frame on the current scene, a looping visual or a full set of prepared scenes. Keep your working collection available when testing a new package.
Streamlabs’ manual overlay instructions create a scene collection and add Image sources to its scenes. That workflow does not imply that a downloaded picture carries camera positioning, alert connections or audio routing. After adding artwork, check those separately in the scene you will actually broadcast.
| Observation | Next change | Expected result |
|---|---|---|
| You received a PNG frame only | Add it as an Image source and position it | Artwork appears without assuming a complete scene install |
| You received several scene assets | Identify which assets belong to Starting, Live and BRB | Each scene gets the intended elements |
| The imported design looks right but sources are absent | Reconnect the local camera/game/audio routes deliberately | A designed scene also becomes a working production |
Check the actual asset when a supposedly transparent frame is opaque. Overlay Background Not Transparent in OBS? Check the File and Layers ↗
Still stuck?
Import Overlay does not show the PNG or video.
Use an Image or local media source in the selected scene; use scene import only for a genuine .overlay file.
The graphic covers the camera or disappears behind gameplay.
Check the source order, then adjust size and placement while preserving the artwork’s proportions.
The animation stops after one play.
Review the loop control in the local media source and watch a complete cycle in the saved recording.
Sources & references
The setup steps follow Streamlabs Desktop’s official image, media and scene-import documentation. November 2026 addition: documentation-based diagnostic examples; no new hands-on hardware result or platform upload test is claimed.
- Streamlabs — How to Add an Overlay to Your Stream ↗Checked 2026-11-04 · Published February 6, 2026
- Streamlabs — Quick Start Guide: Setting Up Streamlabs Desktop for Streaming ↗Checked 2026-10-18 · Published May 20, 2026
- Streamlabs — Mobile LAN Streaming Source Guide ↗Checked 2026-10-18
- Streamlabs — Introducing Media File Caching ↗Checked 2026-10-18
- Streamlabs — Get started with Streamlabs Desktop ↗Checked 2026-10-18 · Published July 22, 2026
Spotted something out of date? Let Alex know.
How we put our guides together ↗