Use the desk edge, a plausible seated eye line and the avatar’s shoulder width as anchors. Adjust the avatar’s scale and height together, then check which parts belong behind the desk and which should remain visible.
In this guide
Identify the room’s seated position
Look for the desk edge, chair, keyboard or another object that suggests where a person would sit. The scene may not follow exact real-world perspective, but those visual cues still establish a likely position. Put a temporary vertical guide through the intended seat instead of dropping the avatar wherever the background is empty.
If the room’s brightest window sits directly behind the face, consider moving the seated position slightly or choosing another room variant. Do not solve every mismatch by making the avatar enormous. A believable scale should leave the room looking like a place around the character, rather than a tiny dollhouse behind a face.
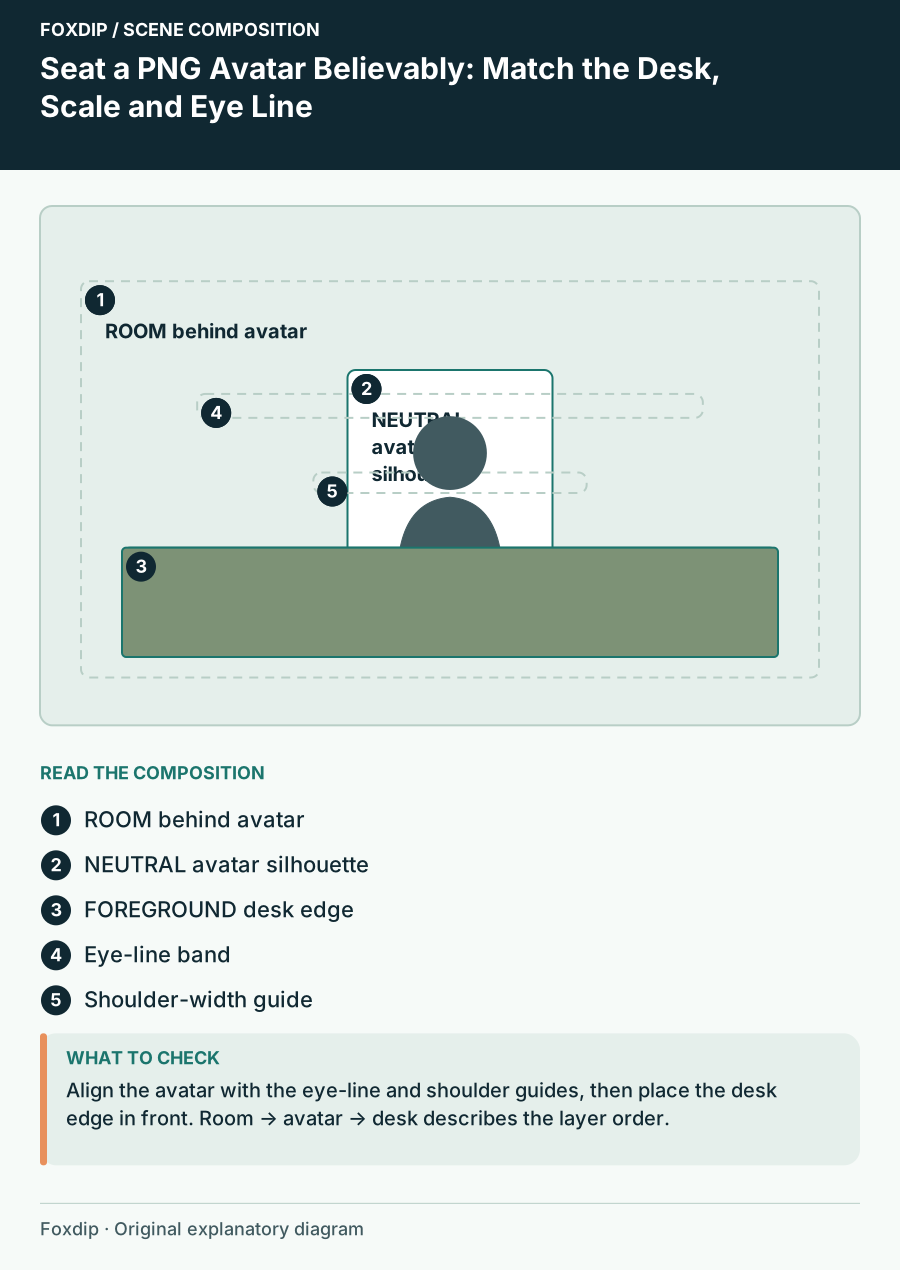
Original Foxdip scene plan. Positions illustrate this example; check the actual game or camera view.
Set three anchors before adding decoration
Mark a desk-edge line, an eye-line band and a shoulder-width target. These are composition guides, not anatomical measurements. A highly stylised avatar may have proportions that differ substantially from a real person, so choose the relationship that looks intentional within this artwork.
Move the avatar vertically until the torso meets the desk naturally, then adjust scale until the head and shoulders fit the intended seat. Repeat those two changes in small steps. Changing only height can leave the character looking too small; changing only scale can push the face out of the room’s natural focus.
Use occlusion to explain the depth
When the artwork provides a matching foreground desk layer, place it over the avatar while the room remains behind. OBS source order determines which elements cover others. This is the basic layer relationship; the more important calibration is where the desk cuts across the body.
Check that the desk hides an appropriate lower part of the torso without swallowing the chin or leaving a floating gap under the shoulders. If the avatar includes drawn hands, decide whether they belong above or behind that edge. A single flat avatar cannot always support both relationships without separate artwork, so do not promise a layer trick will solve every pose.
Keep matching room layers aligned
If a supplied desk and room share the same full-size canvas, preserve their relative position and proportions when fitting them to the scene. Cropping one independently can shift the desk away from the background furniture. Follow the product’s actual layer instructions; do not assume that a room with a desk drawn into it also includes a separate foreground file.
Use a temporary alignment grid or edge markers while positioning, then hide those guides. Check the desk corners, legs and any nearby shelves for mismatches. A small horizontal drift may be more noticeable than a modest change in avatar scale because the foreground and room are supposed to describe the same object.
Check movement and overlays around the face
Preview the avatar’s expected range of motion if your setup includes it, or compare its alternate expressions and poses if it is static. Leave room above the head and beside wide gestures. Place alerts away from that movement envelope rather than measuring only the neutral pose.
Keep a topic card or chat region separate from the desk edge so it does not imply another conflicting foreground plane. A small solid information panel can be easier to place than a second illustrated tabletop. The scene should have one understandable depth relationship.
Save the calibration, then choose the room
Record the avatar size, position and desk alignment once the scene works. Keep a neutral-pose reference image so you can compare later changes. If you switch room moods, verify that the desk and seat geometry remain consistent instead of assuming every variant is identical.
When shopping for a background, compare room perspective, desk-layer availability and the quiet face area before choosing solely by theme. Use real preview files and licence details for the product decision. The result should look intentionally seated, with a clear eye line and an understandable foreground, even before extra props are added.
Sources & references
Foxdip editorial design advice with platform behavior grounded in the linked official documentation. Layout dimensions and palettes are worked examples, not platform requirements.
- OBS: Sources Guide ↗Checked 2026-10-27
Spotted something out of date? Let Alex know.
How we put our guides together ↗