Give the work surface the largest uninterrupted area and test the full reach of your hands before placing graphics. Keep instructions and materials outside that movement envelope, then create a separate close-detail state when the task needs it.
In this guide
Mark the working envelope
Lay out the project, tools and materials as you will use them. Move both hands through the complete task: reach for a tool, rotate the work, lift a component and show a detail. Mark that full region in the camera view. The empty space around a still object may be exactly where your hands need to go next.
Place the most important work near the centre of that envelope, not necessarily the centre of the camera sensor. If you are demonstrating fine marks, leave enough room for the tool tip and your approaching hand. A decorative corner should not hide the place where the next step happens.
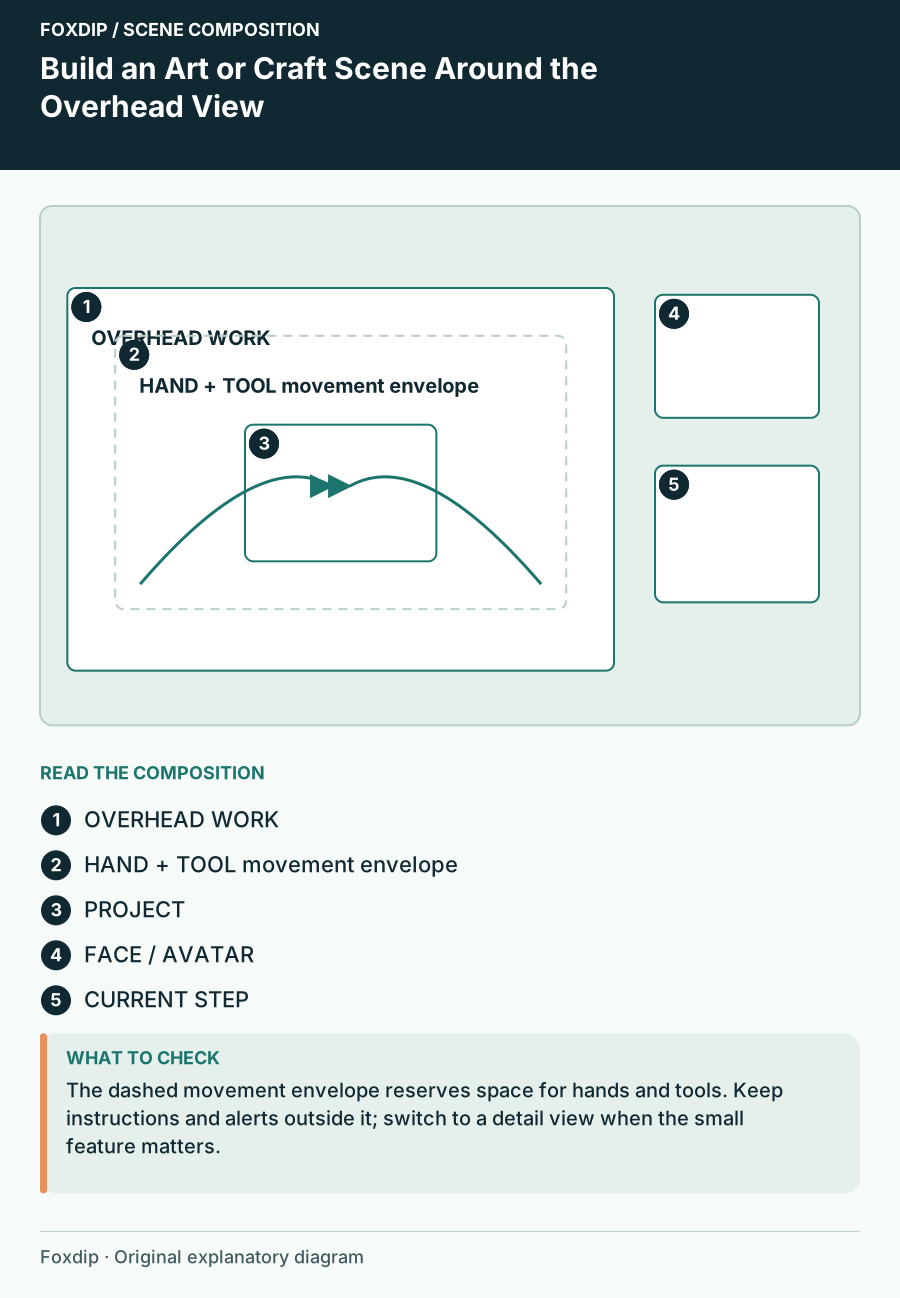
Original Foxdip scene plan. Positions illustrate this example; check the actual game or camera view.
Give the overhead image the main opening
Use a large main view for the work, with a smaller face camera or avatar in a side column if it contributes to the show. Put the current step above or below that smaller camera, away from the hand movement. A materials list can occupy the same column when needed rather than becoming a permanent border around the work.
For a 1920×1080 example, reserve roughly three-quarters of the width for the overhead source and the rest for the face and a short instruction. Fit the actual camera proportionally. OBS supports cropping and numeric transforms, but do not crop so tightly that a rotating project disappears at its widest position.
Create a detail view instead of shrinking instructions
A small mark, stitch or brush tip may need a close view. Prepare a deliberate detail state or a separately arranged view rather than continually enlarging the entire scene on the fly. Show where the detail belongs on the full object before switching, so viewers can keep their orientation.
Keep the close view’s labels short. “Fold along this edge” beside a visible fold is more helpful than a paragraph compressed into a narrow strip. If you need a longer explanation, pause the hands and explain it while the object remains still. The scene design should support your pace rather than demand constant motion.
| View | Main purpose | What stays visible |
|---|---|---|
| Overhead wide | Follow the whole task | Hands, tools and project edges |
| Close detail | See a precise operation | Tool tip and relevant feature |
| Conversation | Explain or answer | Host and current-step context |
Keep the surface visually quiet
Choose a work mat or background that separates from the materials without adding a busy pattern. Pale paper against a pale desk may need a darker mat; a dark object may need a lighter surface. This is a composition check with your real materials, not a universal requirement for one colour.
Place scene decoration outside the captured work surface when possible. A frame painted directly across the bottom of the image can hide tool positions or written labels. Reserve alert space in the side column, and compare the longest test label while both hands are in the overhead view.
Rehearse a whole operation
Record one complete step, including tool pickup, the action and the finished result. Check whether your hand blocks the critical detail, whether the object leaves the frame and whether any label appears backwards. If physical text is reversed in the broadcast image, resolve the orientation before the live demonstration.
Watch the recording in a small player and decide whether the detail state is actually needed. Save the camera opening and movement envelope in your layout notes. When buying craft-themed graphics, choose a design with enough uninterrupted space for making, not merely an attractive illustrated desk.
Sources & references
Foxdip editorial design advice with platform behavior grounded in the linked official documentation. Layout dimensions and palettes are worked examples, not platform requirements.
- OBS: Sources Guide ↗Checked 2026-10-27
Spotted something out of date? Let Alex know.
How we put our guides together ↗